
도순씨의 코딩일지
C++ :: 객체 포인터의 참고관계, 가상함수, 순수 가상함수, 가상 소멸자 본문
🌼 객체 포인터 변수 : 객체의 주소 값을 저장하는 포인터 변수
C++에서는 클래스를 기반으로도 포인터 변수를 선언할 수 있습니다. Person 객체의 주소 값 저장을 위해서 다음과 같은 포인터 변수를 선언할 수 있습니다.
|
1
2
|
Person * ptr; // 포인터 변수 선언
ptr = new Person() // 포인터 변수의 객체 참조
|
cs |
Person형 포인터는 Person 객체 뿐만 아니라, Person을 상속하는 유도 클래스의 객체도 가리킬 수 있습니다. 다음 코드를 살펴봅시다.
|
1
2
3
|
class Student : public Person{
....
};
|
cs |
class Student가 Person 클래스를 상속하고 있습니다.
|
1
|
Person * ptr = new Student();
|
cs |
Person형 포인터 변수가 Student 객체를 생성한 것을 확인할 수 있습니다.
전체적인 코드를 한 번 살펴보도록 하겠습니다.
⭐️ ObjectPointer.cpp
|
1
2
3
4
5
6
7
8
9
10
11
12
13
14
15
16
17
18
19
20
21
22
23
24
25
26
27
28
29
|
#include <iostream>
using namespace std;
class Person{
public:
void Sleep(){cout << "Sleep" << endl;}
};
class Student : public Person{
public:
void Study() { cout << "Study" << endl;}
};
class PartTimeStudent : public Student{
public:
void Work() { cout << "Work" << endl;}
};
int main(void){
Person * ptr1 = new Student();
Person * ptr2 = new PartTimeStudent();
Student * ptr3 = new PartTimeStudent();
ptr1 -> Sleep();
ptr2 -> Sleep();
ptr3 -> Study();
delete ptr1; delete ptr2; delete ptr3;
return 0;
}
|
cs |
⭐️ ObjectPointer.cpp 실행결과
|
1
2
3
|
Sleep
Sleep
Study
|
cs |
🌼함수 오버라이딩
만약에 특정 회사의 직원들이 다음과 같은 형태를 띄고 있다고 가정해봅시다.
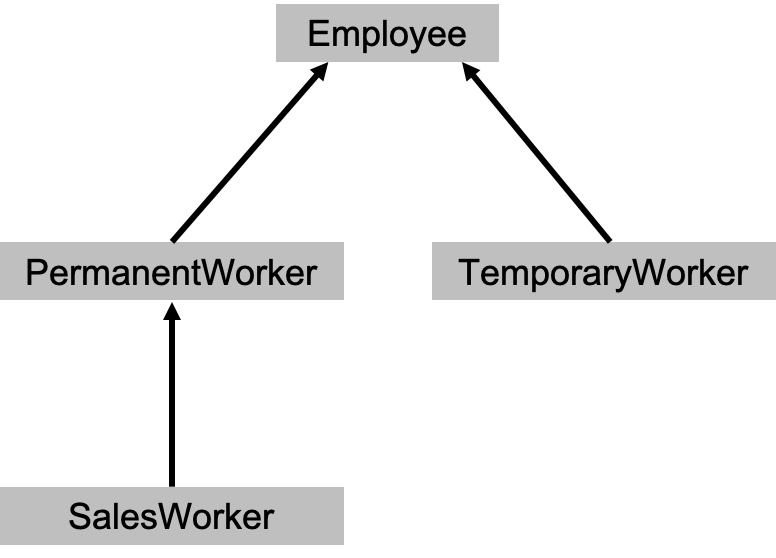
이 구조를 코드로 나타내보도록 하겠습니다.
⭐️ EmployeeManager2.cpp
|
1
2
3
4
5
6
7
8
9
10
11
12
13
14
15
16
17
18
19
20
21
22
23
24
25
26
27
28
29
30
31
32
33
34
35
36
37
38
39
40
41
42
43
44
45
46
47
48
49
50
51
52
53
54
55
56
57
58
59
60
61
62
63
64
65
66
67
|
#include <iostream>
#include <cstring>
using namespace std;
class Employee{
private:
char name[100];
public:
Employee(char * name){
strcpy(this->name, name);
}
void ShowYourName() const{
cout << "name: " << name << endl;
}
};
class PermanentWorker : public Employee{
private:
int salary; // 월 급여
public:
PermanentWorker(char * name, int money) : Employee(name), salary(money){}
int GetPay() const{
return salary;
}
void ShowSalaryInfo() const{
ShowYourName();
cout << "salary: "<<GetPay() << endl << endl;
}
};
class EmployeeHandler{
private:
Employee * empList[50];
int empNum;
public:
EmployeeHandler() : empNum(0){}
void AddEmployee(Employee * emp){
empList[empNum ++ ] = emp;
}
void ShowAllSalaryInfo() const {}
void ShowTotalSalary() const{
int sum = 0;
cout << "salary sum: " << sum << endl;
}
~EmployeeHandler(){
for(int i = 0 ; i < empNum; i++){
delete empList[i];
}
}
};
int main(void){
// 직원관리를 목적으로 설계된 컨트롤 클래스의 객체생성
EmployeeHandler handler;
// 직원 등록
handler.AddEmployee(new PermanentWorker("KIM", 1000));
handler.AddEmployee(new PermanentWorker("LEE", 1500));
handler.AddEmployee(new PermanentWorker("JUN", 2000));
// 이번 달에 지불해야 할 급여의 정보
handler.ShowAllSalaryInfo();
// 이번 달에 지불해야 할 급여의 총합
handler.ShowTotalSalary();
return 0;
}
|
cs |
⭐️ EmployeeManager2.cpp 실행 결과
|
1
|
salary sum: 0
|
cs |
🌼 가상함수
C++ 컴파일러는 포인터 연산의 가능성 여부를 판단할 때, 실제 가리키기는 객체의 자료형을 기준으로 판단하지 않습니다. 포인터의 자료형을 기준으로 판단합니다.
먼저 다음 클래스의 정의를 살펴봅시다.
|
1
2
3
4
5
6
7
8
9
10
11
12
13
14
|
class First{
public:
void FirstFunc() {cout << "FirstFunc"<<endl;}
};
class Second : public First{
public:
void SecondFunc() {cout << "SecondFunc" << endl;}
};
class Third : public Second{
public:
void ThirdFunc() {cout << "ThirdFunc"<< endl;}
};
|
cs |
이러한 상속 관계를 갖고 있기 때문에 아래 코드들은 정상적으로 컴파일이 됩니다.
|
1
2
3
4
5
6
|
int main(void){
Third * tptr = new Third();
Second * sptr = tptr;
First * fptr = sptr;
....
}
|
cs |
그러나 객체를 참조하는 포인터의 형에 따라서 호출할 수 있는 함수의 종류에는 제한이 있습니다.
|
1
2
3
4
5
6
7
8
9
10
11
12
13
14
15
16
17
|
int main(void){
Third * tptr = new Third();
Second * sptr = tptr;
First * fptr = sptr;
tptr -> FirstFunc(); // (o)
tptr -> SecondFunc(); // (o)
tptr -> ThirdFunc(); // (o)
sptr -> FirstFunc(); // (o)
sptr -> SecondFunc(); // (o)
sptr -> ThirdFunc(); // (x)
fptr -> FirstFunc(); // (o)
fptr -> SecondFunc(); // (x)
fptr -> ThirdFunc(); // (x)
}
|
cs |
다음 코드를 통해서 포인터 형에 해당하는 클래스에 정의된 멤버에만 접근이 가능하다는 것을 알 수 있습니다.
🌼 함수의 오버라이딩과 포인트 형
먼저 오버라이딩과 관련된 소스를 한 번 살펴봅시다.
⭐️ FunctionOverride.cpp
|
1
2
3
4
5
6
7
8
9
10
11
12
13
14
15
16
17
18
19
20
21
22
23
24
25
26
27
28
29
|
#include <iostream>
using namespace std;
class First{
public:
void MyFunc() {cout << "FirstFunc"<<endl;}
};
class Second : public First{
public:
void MyFunc() {cout << "SecondFunc" << endl;}
};
class Third : public Second{
public:
void MyFunc() {cout << "ThirdFunc"<< endl;}
};
int main(void){
Third * tptr = new Third();
Second * sptr = tptr;
First * fptr = sptr;
fptr -> MyFunc();
sptr -> MyFunc();
tptr -> MyFunc();
delete tptr;
return 0;
}
|
cs |
⭐️ FunctionOverride.cpp 실행 결과
|
1
2
3
|
FirstFunc
SecondFunc
ThirdFunc
|
cs |
실행 결과를 확인해보면 각각의 포인터에 대한 MyFunc 함수가 호출된다는 것을 알 수 있습니다.
🌼 가상 함수(Virtual Function)
가상함수는 virtual 이라는 키워드를 붙임으로써 선언되는 함수를 의미합니다. 그렇다면 이런 함수는 어떤 역할을 수행할까요? 예제를 통해서 가상함수의 특징을 파악해보도록 합시다.
⭐️ FunctionVirtualOverride.cpp
|
1
2
3
4
5
6
7
8
9
10
11
12
13
14
15
16
17
18
19
20
21
22
23
24
25
26
27
28
29
|
#include <iostream>
using namespace std;
class First{
public:
virtual void MyFunc() {cout << "FirstFunc"<<endl;}
};
class Second : public First{
public:
virtual void MyFunc() {cout << "SecondFunc" << endl;}
};
class Third : public Second{
public:
virtual void MyFunc() {cout << "ThirdFunc"<<endl;}
};
int main(void){
Third * tptr = new Third();
Second * sptr = tptr;
First * fptr = sptr;
fptr -> MyFunc();
sptr -> MyFunc();
tptr -> MyFunc();
delete tptr;
return 0;
}
|
cs |
⭐️ FunctionVirtualOverride.cpp 실행결과
|
1
2
3
|
ThirdFunc
ThirdFunc
ThirdFunc
|
cs |
위의 결과에서 알 수 있듯, virtual 키워드를 붙이면 포인터의 자료형을 기반으로 호출대상을 결정하지 않고, 포인터 변수가 실제로 가리키는 객체를 참조하여 호출의 대상을 결정합니다.
🌼 순수 가상함수
클래스 중에서는 객체 생성을 목적으로 정의되지 않는 클래스도 존재합니다. 이런 함수들을 '순수 가상함수'로 선언하는 것이 좋습니다.
|
1
2
|
virtual int GetPay() const = 0;
virtual void ShowSalaryInfo() const = 0;
|
cs |
순수 가상함수는 위와 같이 몸체가 없는 함수를 뜻합니다. 이러한 함수는 const = 0 을 통해서 잘못된 객체의 생성을 막을 수 있습니다.
🌼 가상 소멸자
가상소멸자는 virtual로 선언된 소멸자를 의미합니다. 가상소멸자가 필요한 이유를 아래 코드를 통하여 살펴봅시다.
⭐️ VirtualDestructor.cpp
|
1
2
3
4
5
6
7
8
9
10
11
12
13
14
15
16
17
18
19
20
21
22
23
24
25
26
27
28
29
30
31
32
33
34
|
#include <iostream>
using namespace std;
class First{
private:
char * strOne;
public:
First(char * str){
strOne = new char[strlen(str) + 1];
}
~ First(){
cout << "~First()" << endl;
delete []strOne;
}
};
class Second : public First{
private :
char * strTwo;
public:
Second(char * str1, char * str2) : First(str1){
strTwo = new char[strlen(str2) + 1];
}
~ Second(){
cout << "~Second()" << endl;
delete []strTwo;
}
};
int main(void){
First * ptr = new Second("simple", "complex");
delete ptr;
return 0;
}
|
cs |
⭐️ VirtualDestructor.cpp 실행 결과
|
1
|
~First()
|
cs |
First 클래스 형태의 객체 ptr을 소멸 명령하니, First 클래스의 소멸자만 출력되었습니다. Second 클래스의 소멸자는 출력되지 않은 것입니다. 이를 막기 위해서 우리는 virtual을 이용할 수 있습니다. First 소멸자에 virtual 선언을 추가하면 됩니다.
|
1
2
3
4
|
virtual ~ First(){
cout << "~First()" << endl;
delete []strOne;
}
|
cs |
📜 출처
윤성우(2010). 윤성우 열혈 C++ 프로그래밍. 오렌지미디어.
'𝐏𝐑𝐎𝐆𝐑𝐀𝐌𝐌𝐈𝐍𝐆 > 𝐂++' 카테고리의 다른 글
| C++ :: 연산자 오버라이딩, 단항 연산자의 오버로딩, 전위증가와 후위증가 오버로딩 (0) | 2020.08.29 |
|---|---|
| C++ :: 멤버함수와 가상함수의 동작원리 (0) | 2020.08.28 |
| C++ :: protected 상속, private 상속, IS-A 관계, HAS-A 관계 (2) | 2020.08.26 |
| C++ :: 상속(Inheritance) (0) | 2020.08.25 |
| C++ :: const, friend 키워드 (0) | 2020.08.16 |

